반응형

Qt Creator bookmark 유지.


Qt Creater를 사용하는데 프로그램을 종료하고 다시 실행하니 기록해 둔 bookmark가 다 사라진다.

이 Bookmark 를 유지하는 방법.


Session 오른쪽의 Manage button 을 누르고 Sessnion Manager 에서 

Restore last session on startup 을 check 한다.


Session에 대해 자세히 알고 싶으면

What is a Session? 을 눌러 볼 것. ^^


728x90
반응형
반응형


Qt Designer로 시작시 Templates 의 차이가 궁금.

Dialog, MainWindow, Widget의 차이가 뭐지?


1. Widget : 우측의 객체 탐색기를 보면. QWidget 클래스다.


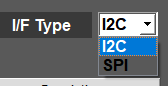
2. MainWindow : QMainWindow 클래스를 사용하고 menubar와 statusbar가 포함되어 있다.


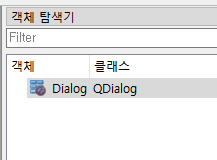
3. Dialog without Buttons : QDialog 클래스를 사용한다.


구글링 하니 아래 내용이 있으니 참고.


When working with widgets the practical choice is between QMainWindow, QWidget and QDialog.

The QDialog choice is obvious for, well, dialogs. It includes and exec() method to start a local loop and has methods to standard dialog actions - accept and reject (ok/cancel).

QMainWindow has features for building a main app experience. It has built-in specialized layout for housing status and tool bars. It also has a powerful docking capabilities for creating dynamic app layouts using QDockWidgets.

QWidget is the generic choice when you don't need any of the above capabilities. This is often true for various tool windows, widgets meant to be embedded in the QDockWidgets and all the windows types that don't have rich widget-based UI eg. games or visualization windows.

Depending on an app type there's usually a single QMainWidget used for the main app window, several smaller QWidget based windows as docks, visualization and tool windows and occasional QDialogs for "talking" to the user.

출처: <https://forum.qt.io/topic/47930/main-window-class-vs-widget-class/4>


참고) Qt Designer 5.14.2 Version

728x90
반응형
반응형


PyQt5 QComboBox의 List 글자색 바꾸기.


배경을 어둡게 하니까 기본 글자색이 검정색이어서 글자가 Highlight 되기 전까지는 보이지 않는다.

그래서 변경하는 방법.


Qt Designer 에서 스타일시트를 편집 한다.


QListView {
  color:white;
}

위 내용을 추가하면 된다.


QListView{
color:white;
}


그러면 아래와 같이 리스트의 글자색이 변경된다.


728x90
반응형
반응형


QComboBox의 drop-down list 아이템 글가 가운데 정렬


선택된 글자만 가운데 정렬하니 이상해서 drop-down list의 글자도 가운데 정렬해 보았다.


그림과 같이 첫 번째 항목만 가운데 정렬되어 있다.


self.comboBoxSerialBPS.setItemData(0, QtCore.Qt.AlignCenter, QtCore.Qt.TextAlignmentRole)   
#First item center aligned


위 코드와 같이 하면 drop-down list의 글자가 가운데 정렬된다.

index 부분만 바꾸면 나머지 항목도 변경할 수 있다.


728x90
반응형
반응형


QComboBox 텍스트를 가운데 정렬하는 방법


ComboBox는 기본적으로 문자가 왼쪽 정렬되게 되어 있다.

Qt Designer 에서도 이것의 정렬하는 속성이 없다.


https://www.geeksforgeeks.org/pyqt5-how-to-make-text-center-align-for-non-editable-combobox/?ref=gcse 


PyQt5 - How to make text center align for non-editable ComboBox - GeeksforGeeks

A Computer Science portal for geeks. It contains well written, well thought and well explained computer science and programming articles, quizzes and practice/competitive programming/company interview Questions.

www.geeksforgeeks.org

위 링크 사이트의 내용을 참고로 하여 작성하였다.


# making it editable
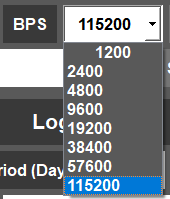
self.comboBoxSerialBPS.setEditable(True)

SerialBPS_list = [ "1200", "2400", "4800", "9600", "19200", "38400", "57600", "115200" ]
self.comboBoxSerialBPS.addItems(SerialBPS_list)
self.comboBoxSerialBPS.setCurrentIndex(7)

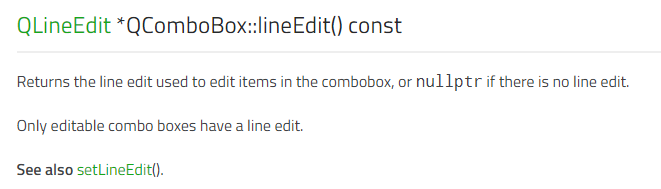
# getting the line edit of combo box
line_edit = self.comboBoxSerialBPS.lineEdit()

# setting line edit alignment to the center
line_edit.setAlignment(QtCore.Qt.AlignCenter)

font = QtGui.QFont('Arial', 12)
font.setBold(True)
line_edit.setFont(font)

# setting line edit to read only
line_edit.setReadOnly(True)


주의할 것은 ComboBox가 Editable 이어야 한다는 것이다.


https://doc.qt.io/qt-5/qcombobox.html#lineEdit


QComboBox Class | Qt Widgets 5.15.8

QComboBox Class The QComboBox widget is a combined button and popup list. More... Public Types enum InsertPolicy { NoInsert, InsertAtTop, InsertAtCurrent, InsertAtBottom, InsertAfterCurrent, …, InsertAlphabetically } enum SizeAdjustPolicy { AdjustToConte

doc.qt.io


이것을 모르고 designer에서 editable을 해제한 상태에서 했더니 setAlignment 에서 에러가 나왔었다.

이거 발견하는데 한 두시간... ㅠ.ㅠ


728x90
반응형
반응형

기능 구현에만 급급하여 코드만 짜다보니 정리가 되지 않아 정리겸 블로깅~

오늘 구현한 폴더에서 특정 확장자만 리스트에 표시하는 기능.


Path 버튼을 눌러 폴더선택 다이얼로그를 열고,

폴더를 선택하면 그 폴더 내에서 .rcp 라는 파일만 리스트 위젯에 등록한다.


아래 코드는 현재 위치의 \Recipe 내에 있는 파일들의 리스트를 위젯에 등록하는 코드이다.

import os
files = os.listdir('.\Recipe')
for file in files:
	self.listWidgetModel.addItem(file)

실행해 보니 파일 뿐만 아니라 폴더까지도 등록되었다. ^^


여기에 추가적인 코드를 더하여 기능을 완성한다.

def pushButtonPath_clicked(self) :
	folder = QFileDialog.getExistingDirectory(self, "Select Directory")
	if folder != '' :
		self.lineEditPath.setText(folder)
		self.listWidgetModel.clear()
		files = os.listdir(folder)
		fileExt = ".rcp"
		for file in files :
			if file.endswith(fileExt) :
				self.listWidgetModel.addItem(file)
	else :
		QMessageBox.about(self, "Error", "Not selected!")


폴더를 선택하지 않고 취소를 하면 메세지를 띄운다.

폴더를 선택했으면 에디트 박스에 폴더 경로를 표시하고,

현재 리스트의 내용을 지우고,

'.rcp' 인 파일만 리스트에 추가한다.


PyQt5로 다시 시작 (1월 20일) 한지 3주째... 

조금씩 되어가지만 아직 한참 멀었다.

기초를 다지지 않고 막 나가는 코드... ㅡ.ㅡ;


728x90
반응형
반응형

wxPython 설치


Python 으로 UI를 구현하고자 검색하다가 wxPython 이 평가가 좋아 보여서 시도.

웹에 나와 있는 소스코드를 따라하고 실행하니 역시 동작하지 않는다.  wxPyton 을 설치해야 하는군...


https://wxpython.org/pages/downloads/


wxPython Downloads

Current Release Starting with wxPython 4.0 (the first Phoenix release) the wxPython source archive and, for supported platforms, wxPython binary wheels are available from the Python Package Index (PyP

wxpython.org


여기에 나와있는데로 실행해 보았다.


에러만 가득... ㅡ.ㅡ;


pip upgrade도 해서 시도해 보았지만 여전히 동일한 에러... ㅡ.ㅡ;


아래 링크에서 파일을 다운로드 받아서 설치 시도해 보았다.

https://wxpython.org/Phoenix/snapshot-builds/


Index of /Phoenix/snapshot-builds


wxpython.org


블로그 검색하여 win32 를 사용해야 한다는 글을 보고 win32를 다운로드 하여 설치 시도.

여전히 에러가 발생한다. ㅠ.ㅠ


설치된 파이썬 버전 3.10 과 wxPython 버전 3.9 (cp39) 의 차이인 것 같다. 

그런데 3.10 은 win32가 없네... ㅡ.ㅡ;

win_amd64는 안 될까?


설치 파일을 보니 python 3.10 amd64 를 설치한 것이였다. 
그래서 win_amd64로 설치.


설치가 되었다!!! ㅋㅋㅋ


설치된 것 확인.


설치 완료. 

이제 코딩을 해 보자~~~


728x90
반응형
반응형

인프런의 남박사의 파이썬으로 실전 웹사이트 만들기 강좌의 마지막에 있는 강의자료를 다운 받고 사용하는 방법.

강의 자료를 받고 압축을 풀면 텍스트 파일로 쥬피터노트북 사용법이 아래와 같이 간략히 나와 있다.

# 1. 쥬피터노트북 설치

pip install jupyter

# 2. 명령프롬프트 상태에서 쥬피터노트북 압축 해제된 폴더에서

jupyter notebook

# 3. 브라우저에서 강좌내용 참조


우선 쥬피터 노트북 설치.

Visual studio code를 실행하고 Terminal 에서

pip install jupyter 입력.


설치가 진행된다.

위와 같이 설치가 완료되었다.

그리고 강의 자료가 있는 폴더로 가서

jupyter notebook 실행.

위와 같은 메시지가 뜨면서 쥬피터 노트북이 실행되고 강의 자료가 열린다.

강의를 보면서 열심히 메모했는데.... 친절하게 강의자료도 만들어 올려놓으셨다. ^^

728x90
반응형

+ Recent posts