반응형

Raspberry Pi Pico 에 연결된 I2C slave address 읽기.


아래 링크의 자료를 참고로 하여 확인.

https://remnant24c.tistory.com/305


RaspberryPi Pico에 연결된 I2C 모듈의 주소 알아내기

안녕하세요. RaspberryPi Pico에 연결된 모듈의 I2C 주소를 모를 경우 데이터를 가지고 올 수 없습니다. 만약 데이터 시트를 가지고 있다면 큰 문제가 되지 않지만, 모를 경우 간단한 코드로 확인할 수

remnant24c.tistory.com


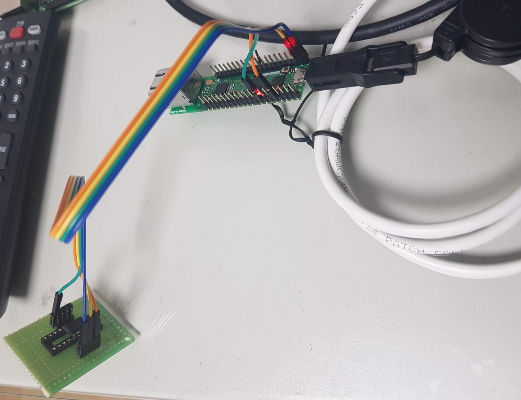
아래 사진과 같이 배선 연결. 3.3V, GND, I2C0 SDA, I2C0 SCL.


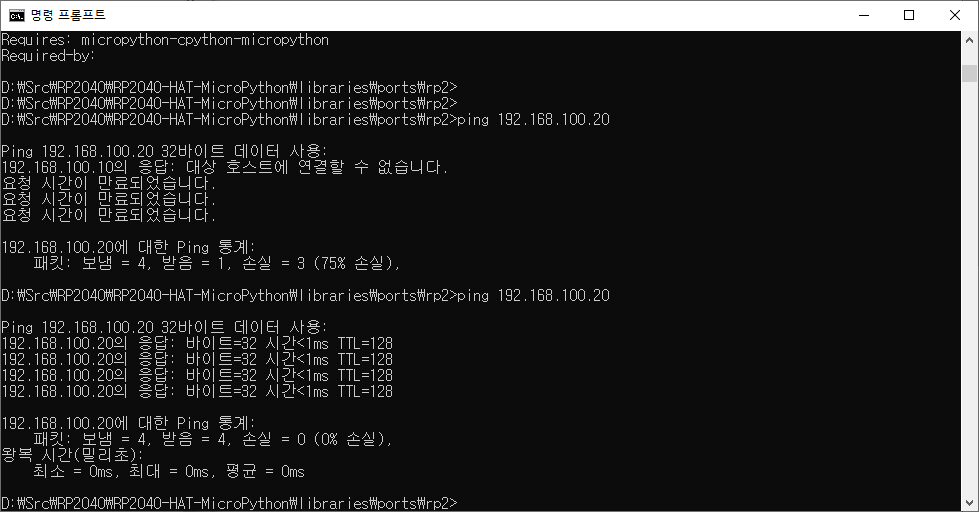
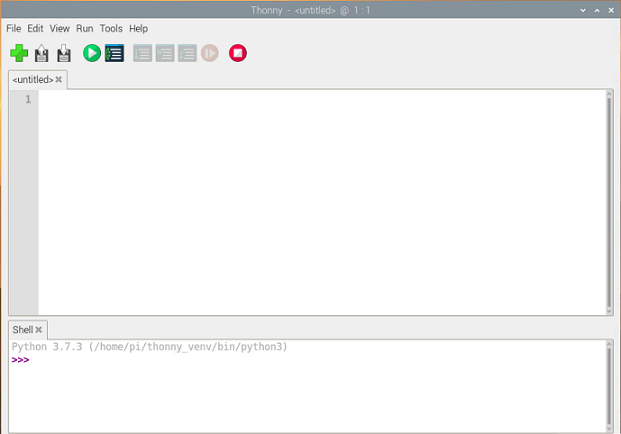
아래와 같이 I2C EEPROM의 slave address로 0x50 주소가 읽혔다.


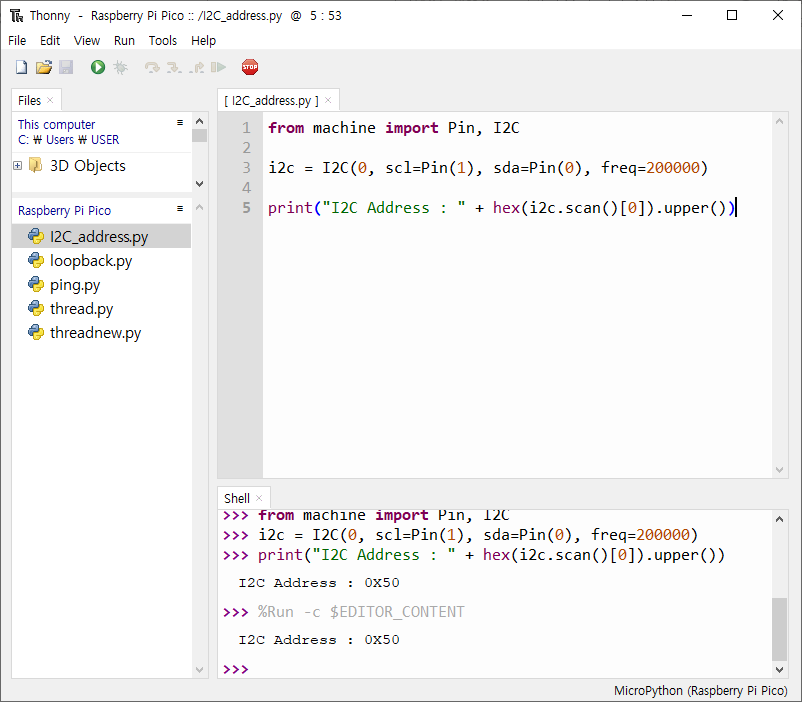
왼쪽은 console 에 입력하여 결과 확인, 오른쪽은 Pico module 에 소스를 다운로드 하여 실행한 결과이다.


from machine import Pin, I2C

i2c = I2C(0, scl=Pin(1), sda=Pin(0), freq=200000)

print("I2C Address : " + hex(i2c.scan()[0]).upper())


728x90
반응형
반응형

Qt Creator bookmark 유지.


Qt Creater를 사용하는데 프로그램을 종료하고 다시 실행하니 기록해 둔 bookmark가 다 사라진다.

이 Bookmark 를 유지하는 방법.


Session 오른쪽의 Manage button 을 누르고 Sessnion Manager 에서 

Restore last session on startup 을 check 한다.


Session에 대해 자세히 알고 싶으면

What is a Session? 을 눌러 볼 것. ^^


728x90
반응형
반응형

Raspberry Pi Pico & WizNet W5100S-EVB-Pico 개발 환경 최종 정리.


1. W5100S-EVB-Pico firmware download

  BOOTSEL 버튼을 누른 상태에서 USB로 연결.

  인식된 드라이브로 firemware file copy.


rp2_w5100s_20220318_v1.04.uf2
0.65MB


2. Thonny 설치 및 Raspberry Pi Pico 설정.


위 두 가지만 하면 Thonny 의 console 창을 통해 Raspberry Pi Pico 를 사용할 수 있다.

다른 PC로 위와 같이 설정하여 사용중~ ^^


728x90
반응형
반응형

앞에 이어서 Raspberry Pi Pico & WIZnet Ethernet HAT Ping test 3 번째.


아래 링크의 STEP-2 : Setup Ethernet Library 부분 부터 따라하기 하려 했는데...

그냥 참고만 하고.


https://github.com/Wiznet/RP2040-HAT-MicroPython/blob/main/Ethernet%20Example%20Getting%20Started%20%5BMicropython%5D.md


GitHub - Wiznet/RP2040-HAT-MicroPython

Contribute to Wiznet/RP2040-HAT-MicroPython development by creating an account on GitHub.

github.com


Ethernet example testing 

w5x00_ping_Test.py 파일의 링크가 안 되어 있다.

아래 링크에서 찾았다. ^^

https://github.com/Wiznet/RP2040-HAT-MicroPython/tree/main/examples/PING_TEST

그러나 clone 한 폴더에 샘플 소스가 있다. ^^

d:\Src\RP2040\RP2040-HAT-MicroPython\examples\PING_TEST\


이것을 Thony 에서 Open.

File > Save as > Raspberry Pi Pico 선택하여 Raspberry Pi Pico로 저장한다.

그리고 실행 Run.


결과는 에러 메시지... ㅡ.ㅡ;

usocket 라이브러리 찾아 설치를 해 보는 등 다양한 방법을 찾아 보았다.

그러나. 

처음에 다운로드 받았던 firmware 파일을 Raspberry Pi Pico 에 copy 하는 것으로 간단히 해결된다.

Thonny의 Firmware가 최신일 것으로 판단하여 그대로 진행했는데... 

W5100s_1.0.4.uf2 를 사용해야 한다.


복사하는 방법은 BOOTSEL 버튼을 누른 상태에서 USB cable을 연결하면 드라이브로 인식된다.

이 드라이브에 firmware 파일을 복사하면 된다.


다시 Thonny를 실행하고 ping test 예제를 open, Save as로 Raspberry Pi Pico로 저장 후 실행.

Ping 테스트를 하여 정상 동작되는 것이 확인된다.

참고로 IP 주소는 내 PC에서 테스트 하는 환경에 맞게 기존 소스에서 변경하였다.

  PC : 192.168.100.10

  Raspberry Pi Pico & Wiznet HAT : 192.168.100.20

이상으로 오늘의 작업 기록 완료!


728x90
반응형
반응형

앞의 내용에 이어서 Raspberry Pi Pico & WIZnet Ethernet HAT Ping test 2


WIZnet W5100S-EVB-Pico를 연결하면 아래와 같이 RP2 Boot 가 장치관리자에 보인다.


Thonny를 실행하고 Tools - Options... 의 Interpreter tab 선택.


MicroPython (Raspberry Pi Pico)를 선택하고 "Install or update firmware" 선택.

Install을 눌러서 설치를 완료한다.


그러면 위와 같이 Shell 이 나타난다.

여기에 Python 코드를 입력하여 테스트를 해 볼 수 있다.


아래 링크에 나와 있는데로 테스트를 해 볼 수 있다.

https://projects.raspberrypi.org/en/projects/getting-started-with-the-pico/4


Projects | Computer coding for kids and teens | Raspberry Pi

Computer coding for kids, teenagers and young adults. Step-by-step instructions for 250+ free coding projects. Create games, animations, and more with code.

projects.raspberrypi.org


참고로 아래와 같이 간단히 출력 테스트를 해 볼 수 있다.


728x90
반응형
반응형

저렴한 이더넷 변환기 구축을 목표로 구매한 보드.

WIZnet Ethernet HAT (WIZnet W5100S-EVB-Pico)


간단히 Ping test 부터 시작! (Windows 10 환경)


환경 구축은 아래 사이트를 참고로 하여 구성하였다.

https://github.com/Wiznet/RP2040-HAT-MicroPython/blob/main/Ethernet%20Example%20Getting%20Started%20%5BMicropython%5D.md


GitHub - Wiznet/RP2040-HAT-MicroPython

Contribute to Wiznet/RP2040-HAT-MicroPython development by creating an account on GitHub.

github.com


MicroPython과 CircuitPython을 지원하는데 MicroPython이 더 좋아 보여 선택.


검색해 보니 MicroPython은 Raspberry Pi 에 공식적으로 나와 있다.

https://www.raspberrypi.com/documentation/microcontrollers/


Raspberry Pi Documentation - Microcontrollers

The official documentation for Raspberry Pi computers and microcontrollers

www.raspberrypi.com


CircuitPython은 adafruit 에서 만든 것이라고 한다.


개발 환경 구죽.

개발 환경 구성에 나와 있는데로 따라 했다.

 - CMake 설치. https://cmake.org/

 - Thonny 설치. https://thonny.org/


Firmware 다운로드.

 WIZnet W5100S-EVB-Pico 보드를 구매 했으니 V1.0.4 : W5100s_v1.0.4.uf2 를 다운로드.


rp2_w5100s_20220318_v1.04.uf2
0.65MB


STEP-1 : Micropython 설치.

1. 소스 다운로드 : 소스를 다운로드할 디렉토리를 만들고 git clone


/* Change directory */
// change to the directory to clone
cd [user path]

// e.g.
cd D:/RP2040

/* Clone */
git clone https://github.com/Wiznet/RP2040-HAT-MicroPython.git


2. 패치.

  clone을 하면 patch 파일이 아래의 포함되어 있다.

     0001-Added-WIZnet-Chip-library.patch : about Ethernet(WIZnet Chip)
     0002-Added-AXTLSlibrary.patch : about SSL/TLS(AXTLS)

  다운로드한 위치로 가서 아래 명령 실행.

// e.g.     cd D:/RP2040/RP2040-HAT-MicroPython
cd [user path(=github source code setup path)] 
/* Patch and submodule */
cmake CMakeLists.txt

  그런데... 패치 에러가 났다. ㅡ.ㅡ;

  일단은 그냥 계속... ㅋㅋ


3. Compile

  환경 설정에 아래와 같은 내용이 있어서 컴파일 안하고 넘거감. ^^

  • If you must be need to compile the micropython ,your pc should be use Linux or Unix environment.

Thonny IDE 설치

  아래링크의 내용을 따라 하라고 한다.

https://projects.raspberrypi.org/en/projects/getting-started-with-the-pico/0


Projects | Computer coding for kids and teens | Raspberry Pi

Computer coding for kids, teenagers and young adults. Step-by-step instructions for 250+ free coding projects. Create games, animations, and more with code.

projects.raspberrypi.org

  그냥 실행파일 설치하고 실행했다.


처음 실행하면 위와 같은 화면이 나온다.

쓰다보니 너무 길어져서 다음으로~


728x90
반응형
반응형


Qt Designer로 시작시 Templates 의 차이가 궁금.

Dialog, MainWindow, Widget의 차이가 뭐지?


1. Widget : 우측의 객체 탐색기를 보면. QWidget 클래스다.


2. MainWindow : QMainWindow 클래스를 사용하고 menubar와 statusbar가 포함되어 있다.


3. Dialog without Buttons : QDialog 클래스를 사용한다.


구글링 하니 아래 내용이 있으니 참고.


When working with widgets the practical choice is between QMainWindow, QWidget and QDialog.

The QDialog choice is obvious for, well, dialogs. It includes and exec() method to start a local loop and has methods to standard dialog actions - accept and reject (ok/cancel).

QMainWindow has features for building a main app experience. It has built-in specialized layout for housing status and tool bars. It also has a powerful docking capabilities for creating dynamic app layouts using QDockWidgets.

QWidget is the generic choice when you don't need any of the above capabilities. This is often true for various tool windows, widgets meant to be embedded in the QDockWidgets and all the windows types that don't have rich widget-based UI eg. games or visualization windows.

Depending on an app type there's usually a single QMainWidget used for the main app window, several smaller QWidget based windows as docks, visualization and tool windows and occasional QDialogs for "talking" to the user.

출처: <https://forum.qt.io/topic/47930/main-window-class-vs-widget-class/4>


참고) Qt Designer 5.14.2 Version

728x90
반응형
반응형


PyQt5 QComboBox의 List 글자색 바꾸기.


배경을 어둡게 하니까 기본 글자색이 검정색이어서 글자가 Highlight 되기 전까지는 보이지 않는다.

그래서 변경하는 방법.


Qt Designer 에서 스타일시트를 편집 한다.


QListView {
  color:white;
}

위 내용을 추가하면 된다.


QListView{
color:white;
}


그러면 아래와 같이 리스트의 글자색이 변경된다.


728x90
반응형

+ Recent posts